Showing posts with label CSDesigns. Show all posts

Tuesday, 26 June 2012

Good Bye, Anna May Wong!

Welcome!

There is a time for everything, a time to arrive, a time to leave, a time to live, a time to die...

Anna May Wong was a mere 56 years old when she passed on. This is just 4 years older than my current age. It lead me to some introspection.

Anna May Wong lead a full life and was never hampered by preconceived ideas and prejudices. She carved her own destiny and visited distant shores in search of her dream. The way people treated her did upset her, but she rose above that.

My card pays tribute to a remarkable actress, a remarkable woman, a trail-blazer who triumphed despite adverse circumstances, hostile communities, prejudices.

Anna May Wong, I salute you!


 Here is a close-up look:


Image Anna May (Mae) Wong 1 by CSdesigns.
Challenge : Art with No Boundaries Anything Goes/Performing Arts 2

Monday, 18 June 2012

Vintage Movies

Welcome!

It's time for a new challenge at Art with No Boundaries!

The main theme is Anything Goes, the twist is The Performing Arts.

Chris from CSDesigns has created this amazing beauty, Anna May Wong plus some other related images celebrating the Performing Arts.

My card is a Vintage CAS style card using one of the new images.


Hope you like it and that you will be inspired to create your own project celebrating the Performing Arts.

Monday, 11 June 2012

Frilly Metal

Welcome!

It is week 2 at Art With No Boundaries and the Theme is still Anything Goes / Heavy Metal!

The design team was again asked to use metal and I decided to go with silver. Ok, I know, this is not a heavy metal, but because we are doing something for the men in our lives, I decided to go feminine with my metal. And all the metal is in any case out of my own toolbox.

I used the fabulous Metal & Screws for my pink & silver tag. The image was coloured with my pencils and blended. The flowers & scrolls were made with the foil lid of a coffee tin. The edges of the mats were very lightly distressed.

Well, here is my frilly metal tag:


Here she is a bit closer:


And here you can see the flowers:


I hope this has inspired you to also make something using a bit of metal, a washer or a piece of foil, and then joining the challenge.

Do visit Art With No Boundaries, I'm sure you will be inspired. The Design Team always comes up with wonderful creations, and the other entries are also quite amazing! Leave a comment so that we know that you visited. You will also get a chance to get to know the team better...

Monday, 4 June 2012

Buttoned-up Metal

Welcome!

A new month means a new challenge on ArtWithNoBoundaries!

The theme for the first fortnight is : Anything Goes Heavy Metal.

Yes, it's a double challenge again! You can enter any of your fabulous new projects or take part in the Bonus Round and follow the theme. This put you in line for a unique sentiment from CSDesigns.

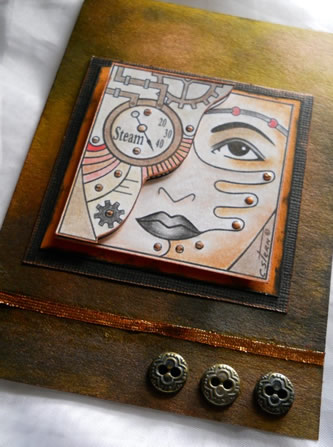
My creation evolved from the image I started with: Solitaire Heavy Metal. I foiled the screws on the images. That was how the faux metal idea started. I played around with some of the other images, but couldn't really decide what to use. Then I coloured Solitaire and 3D'd her. Things started to take form. I layered her on black and orange cardstock that I dabbed with some black. The kraft card I wanted to use looked, ummhh boring. Out comes my inks and paints and stamppads and some sponge.

10 minutes later and on the second card, and I think it looks rather metally, rusty yes, but like metal....

Solitaire is added to the card, together with a bronze metallic ribbon. But something is missing. I go through some stuff and find what my card need, 3 metal buttons with an interesting pattern. I think they are a perfect fit and finish.

Here is Solitaire with her faux and real metal:


From another angle:


A bit closer:


The buttons:


Well, I hope you liked my card as much as I enjoyed creating it.

If you did, go and find a bit of metal, in your man's toolbox, or as a last resort, your sewing box. Then join our challenge.

While you are there, have a look around and be sure to visit the blogs of the others on the Design Team. We have 3 new team members : Bonnie, Lori & Paula! You'll love their fabulous creations too, I'm sure!


Friday, 1 June 2012

Mysterious Metal

Welcome!

Time for a new challenge at Recycle, Re-purpose and Re-invent!

The main challenge is still Anything Goes, and this time the Bonus Challenge is : Heavy Metal.
Use some metal anywhere in your creation, preferably a piece that you are recycling or repurposing.

We are also welcoming 3 new members to the Design Team.

They are:
Lori Hairston - Choux-Chous, French for My Little Cabbage

Make sure that you visit the blogs of these talented ladies.
I am Looking forward to see what they will create with the fabulous CSDesigns!

Back to showing my metal...

I decided to make a card using the fabulous Heavy Metal Solitaire, Nuts and Bolts Mini Background and Metal Phrase Collection.

My piece of recycled metal is from the foil lid of a coffee tin. I used it to mat the mystery phrase. My re-purposed metal is the staples that I used to make a little pattern on the silver panel. The 3 metal washers is re-invented as embellishments on my card!

The splash of red lipstick on the face of Solitaire adds to the mystery of this mainly black and white card. This is my favourite colour combo.

Well, here she is:  


Remember, you have a whole month to play along with us! Go and scratch  in that toolbox and create something with some added metal...

Monday, 28 May 2012

Framed Flower

Welcome!

It's week 2 of the Frame of Mind challenge at Art with No Boundaries.

But first things first: The CSDesigns DT call is still open, so if you think you have what it takes, go here and follow the instructions.

One of our team members is saying goodbye: Sharon, I'll miss your inspirational projects! I was always looking forward to see what you have created. It was great working with you!

This week I'm working with the  Striped Circular Petal Frame, and since I'm still thinking out of the box, I made a flower with my frame:


I have added a tutorial where you can see in a few steps how easy it is to make your own!

Now I hope you are inspired to add your own framed creation to the challenge!

Here is the wonderful new frames again:


Framed Flower Tutorial

Welcome!

In a few easy steps, I want to show you how to make a framed flower card:

1. Print out your Striped Circular Petal Frame in a few sizes and colours.


2. Optional step: Colour your frames - I skiped this one.

3. Cut out the frames


4. Cut the petals loose and shape them by rolling over a pencil.

5. Cut stem from Diamond Dot Mini Background as well as mat for sentiment.


6. Add stem to narrow card, layer petals & add to stem. Add sentiment.


7. Fix rhinestone to flower and add some glitter glue. (Stickles)


8. Done!

And here's a close-up of the flower:


Hope you like my tutorial!

Can't wait to see your creations!

Monday, 21 May 2012

Framed Fashionista!

Welcome to my corner in the Craft Lane!

A new week, a new challenge at ArtWithNoBoundaries!

It is a double challenge again, the main theme Anything Goes.
The bonus Round for the next 2 weeks is : A Frame of Mind.
The challenge : use a frame, any kind of frame in your project.
The prize: A unique sentiment from Chris of CSDesigns!

Chris has been creating some new frames to go with the Express Yourself Series and the challenge for the DT was: think out of the box.

For some reason or another, my brain read 'box' and that is all I could think of...


I used the Striped Square Scallop Frame and cereal boxes to create my basic box. It was also used to create the floortile pattern. The Diamond Dot Mini Background was used for the right wall panel. Silver board gives the illusion of a mirror and a piece of white fabric and a black ribbon creates a curtain. The Lace Dress form was printed 3 times, coloured, cut out and made into a mannequin and positioned in the middle of the salon room.

Here is a selection of photos from different angles:


And if you wondered, I had tremendous fun making my little framed fashionista box!

Here you can find the lovely frames:


Reminder:
CSDesigns has a DTCall!
You can find all the details here!


I want to enter my creation in a few challenges:

My first challenge is the one at Kaboodle Doodles. The theme is Dressed for Success and there has to be a piece of clothing, some fabric, some interpretation of the theme. My salon with the dress form fits this challenge.
The second is at Ooh-la-la Creations where the challenge is Ribbon or Twine - a ribbon ties the curtain.
Chana invited me to join their Anything Goes Challenge #5 at Jackson's Digital Expressions. I'm not using the sketch, but with a little imagination it might look like it. :). My project is really monochrome with one colour, so the duet of colours is almost applicable...
The challenge at Lexi's Creations is Black and White with one colour - my one colour is a purply pink.
Whoopsiedaisy Challenge says: Shape It, and I think my project has enough shape!
At Stamps & Fun = Creativity it is Anything Goes and I'm joining there too!
Take A Word has the word Dream, and I think my project has an element of dream in it, that dream dress or dream room...
Paper Make-up Stamps has a Recycle Challenge. I used cereal boxes to create the walls.
Bunny Zoes Craft's challenge is also Anything Goes.
PileItOnChallenge asks for a Pattern Mix of Scales. I used the same frame of the walls to create the floor pattern.
I'm also joining the Crazy Challenge where Challenge #120 is 3D - my mannequin and box is 3D!
Wow, that's quite a few challenges for me!

Hope I have inspired you to find that frame and finish a project for the challenge!

Monday, 14 May 2012

Wheels of Time is Fit to be Tied

Welcome!

It is the second week of the Anything Goes Fit to be Tied Challenge on ArtWithNoBoundaries. 
 
Before I get to a few important things, take a Sneak Peek at my card:


CSDesigns is having a Design Team Call!

Read all about it here : CSDesigns Team Call.

The challenge rules have changed. Read the New Challenge Rules here!
The important thing is to make sure you follow the simple rules when you enter in a challenge.


The fun part of this fortnight's challenge is that it is actually 2 challenges in one. The first is Anything Goes, and the second Fit to be Tied. You have to tie something, but not with ribbon, lace or seambinding. That leaves quite a few options open!

What you also have to tell us, is how your project was inspired and created. It is an inspiration challenge and we really want to inspire each other to try new things, revive old things and have loads of fun in the process! I find the whole creative process very interesting, so I enjoy reading all that is written!

Bonus! There is a prize. Do visit ArtwithnoBoundaries to see what you can stand in line for! Chris's sentiments are so special and unique that it is worth entering the challenge!

Now for my card: I like working with black and dark boards, and then always forget that I have some trouble photographing the end product! Especially when I use some shiny stuff combined with the black!

I have fallen in love with the Spirellis. When you see what has been done you'll understand why! This is a manual kit, so if you love cutting - I do - you'll enjoy this! They will pop up many times in future, I'm sure! My Spirellis were printed on Kraft board and cut out. Then I started playing around with the cottons and threads I have. What great fun to work out different patterns! The lovely Solitaire Leather and Rivets was my choice for an image to add to the one Spirelli.

Here is my card:


I added some gold paint around the edges. This I burnished with some black shoe polish to tone it down a bit.

The title is something that just came into my mind. The gold represent the golden times and good memories. Without the black, the other colours won't show up so well.

I really hope that my card inspired you to come and join the challenge.

And here is a last look at the wonderful Solitaire Leather and Rivets.


Tuesday, 3 April 2012

The Eyes Have it!

Welcome!

A new month, a new challenge at Art with no Boundaries!

The theme for the next 2 weeks is 'The Eyes Have it!'

I've used ink to colour my images. The way the ink flowed and dryed accented her eyes. I created a border with Arty Expressions 2.

Here is my creation:


And here is a close-up:


And a close-up of the corner and background panel:


I hope you will join us in the challenge!

Saturday, 31 March 2012

Recycle and Earth Hour

Welcome!

What a lovely way to launch the Recycle Challenge on the newly revamped Blog by choosing today, 31 March 2012 which is also the Earth Hour Day this year. 

First things first:

Here is my tag for the Anything Goes challenge:


And here is what I've used for my tag:


 I've used the box that the coffee filters came in and the express bag. The Framed Geisha 2 was printed on Acetate. The red semi-circle was also from the bag, as well as the little fan. I used the back (inside) of the bag that is black. Some gold paint did the trick, and off course some beads and gold and black sewing thread!

Here you can see it in close-up:


I added some ribbon, one which was recycled ribbon from a gift. What do you think, was my recycling successful? Is it inspiring you to also take part in the challenge? I hope so! 

Remember, you have the whole of April to play, the theme is Anything Goes, and you can even backlink! As long as you re-cycle, re-purpose or re-invent!

But wait, there is some more...

A Bonus!

With the Bonus you have to answer a question to stand in line for a bonus surprise! Just 1 question!

April's question is:

What’s the strangest thing you have been hoarding for the purpose of using it in your art and how do you plan to use it?

I've been collecting envelopes at the office for a long time and have used them.  One day I saw one of the express mailing bags all torn, the black inside contrasting with the yellow outside, and I thought, this can work for something... Today you are seeing that something! Maybe not the strangest, but I don't think many people save those bags.... They come in all these bright colours, so I'll definitely find more uses for them!


Earth Hour
I've done my bit for Earth Hour and switched off all the lights in my house for 2 hours, because I felt a bit bad that I still watched TV.... Read more about Earth Hour here. Remember, every little bit helps, that 1 hour of no lights, that recycled box, that re-used bag. Thank you for doing your bit.

I'm looking forward to see what you come up with for the challenge...and what you have been hoarding.

Friday, 16 March 2012

Wings and Blooms Blog Hop is here!

So glad you came to visit!

If you are here for the Crafting By Designs Blog Hop, you are at the right place!
If not, I hope you will join us. Either way, you are welcome to browse around.


Crafting By Designs Blog Hop Route:
Did you arrive from : Chrissie Tobas at  HarvestmoonPapiere?
Then you are on the right track! (PS. Chrissie makes the most wonderful mini-albums, so make sure you visit her site again. You'll find loads of inspiration!)
If you landed here from somewhere else, the start of the hop is on Doris's blog where she has the list of all 18 participants. You might like to start there, but that's up to you. Have fun!

Have you been enjoying the hop so far? Are you also enjoying the fabulous creations everybody has made? Have you been inspired? After the blog hop, you can join in the fun by posting your Wings and Blooms Creation on the Crafting By Designs Blog Hop Post.


Please note: The hop started on 16 March 2012 at 9:00 am EDT and will end on Monday 19 March 2012 at 11:59 EDT.

A Blooming little tutorial:
For the Hop I decided to do some recycling. I had this idea for a while, to paint/stain/colour used envelopes and punch flowers from it. These I can then use in a project(s).

Start with some used envelopes & inks, soft brush & water: 


Apply ink with soft brush. The soft brush hold water which then dilute the ink. You can use watercolour paint in the same way. 

Here is my work in progress:


Let the papers dry or use a heat-gun if you are in a hurry. 


Some of the punches I used:


The finished 'Enchanted Forest' card using my punched flowers plus a piece of paper for the background. I added some glitter to the flowers. There are 3 little birds that I added with my fine-liner. They are just circling the trees.


A close-up of the flowers.


The sentiment is by Chris Stern from CSDesigns.


Just a note on the paper : Envelope paper is quite thin, so you might find that some punches don't punch too well. Try 2 layers together. The thin papers give the flowers a semi-translucent look, almost life-like. Enjoy making flowers, but especially recycling!


Do remember to leave a comment, there is a little surprise for one lucky commenter at the end of the Hop.

Well, I hope you enjoyed my quick tutorial.
Time now to visit Aletha Jane Williams at AJ’s Designs.

Enjoy the rest of the Hop and all the other creations! 

Do Visit again!